Licensing
A Spine license is required to integrate the Spine Runtimes into your applications.
Rendering
Materials
Each atlas page Texture requires its own Material, which is automatically created upon skeleton import. When using Slot blend modes other than Normal, additional Materials are created for each blend mode as well (except for Additive when using PMA, which can be rendered with the normal material). The Materials array of a MeshRenderer is managed by the SkeletonRenderer every frame, depending on the currently assigned attachments and the AtlasAssets these are contained in, and the used blend mode at the Slot.
Note: Direct modifications to the Materials array have no effect as they will be overwritten in the following
LateUpdate()call. Use a SkeletonRendererCustomMaterials or SkeletonGraphicCustomMaterials component to override materials. You can also assign different Materials at the _Atlas asset to change Materials for all instances. After any _Atlas asset modification you may need to hitReloadat theSkeletonData Assetparameter of yourSkeletonRenderercomponent to reload the skeleton using the new atlas materials.
Note: Only use Materials with a
Spine/SkeletonGraphic*shader withSkeletonGraphiccomponents. Do not use URP, LWRP or normal shaders likeSpine/Skeletonwith aSkeletonGraphiccomponent. See SkeletonGraphic - Important Material Requirements for details.
Material Switching and Draw Calls
If assigned attachments are distributed across multiple atlas pages or have different blend modes, e.g. material A and material B, the Materials array is set according to the draw order in which the materials are needed.
If the order is:
- Attachment from A
- Attachment from A
- Attachment from B
- Attachment from A
The resulting material array will be:
- Material A (for attachments 1 and 2)
- Material B (for attachment 3)
- Material A (for attachment 4)
Every material in the Materials array corresponds to a draw call. Therefore a high amount of material switching adversely affects performance.
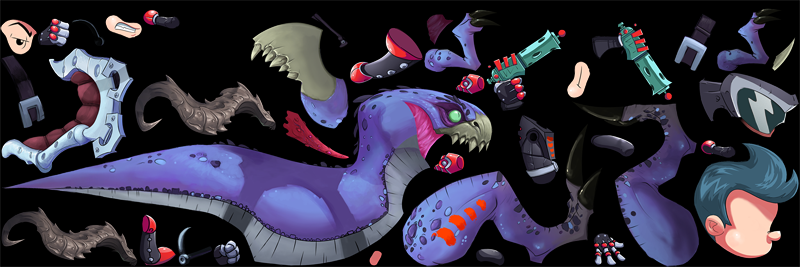
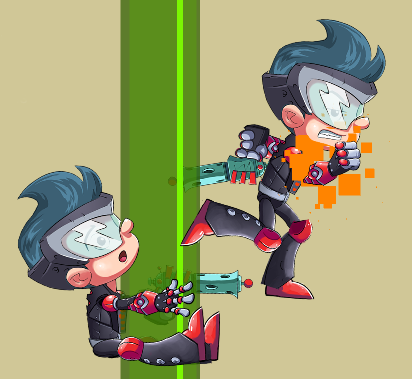
The Dragon example shows an unfortunate use case with many draw calls: 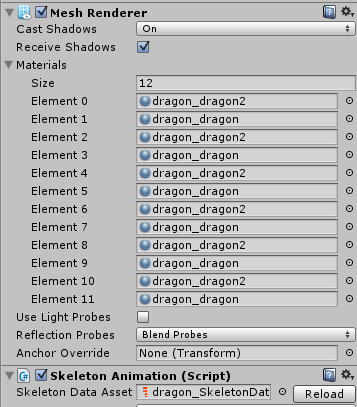
It is therefore recommended to pack attachments to as few atlas pages as possible, and to group attachments to atlas pages according to draw order to prevent unnecessary material switching. Please see Spine Texture Packer: Folder Structure on how to arrange atlas regions in your Spine atlases.
Changing Materials Per Instance
Note: Direct modifications to the SkeletonRenderer's Materials array have no effect as they will be overwritten in the following
LateUpdate()call. If none of the methods below are suitable, you can manually overrideMeshRenderer.Materialsevery frame by using theSkeletonAnimation.OnMeshAndMaterialsUpdatedcallback delegate. This callback is called at the end ofLateUpdate()after atlas materials have been assigned.
CustomMaterialOverride and CustomSlotMaterials
SkeletonRenderer allows you to override Materials on specific slots or override the resulting materials.
To replace an original material with your new material at runtime for an instance of SkeletonRenderer, you can use SkeletonRenderer.CustomMaterialOverride:
// MeshRenderer.material will not work, MeshRenderer.sharedMaterial might fail in some cases.
if (originalMaterial == null)
originalMaterial = skeletonAnimation.SkeletonDataAsset.atlasAssets[0].PrimaryMaterial;
skeletonAnimation.CustomMaterialOverride[originalMaterial] = newMaterial; // to enable the replacement.
skeletonAnimation.CustomMaterialOverride.Remove(originalMaterial); // to disable that replacement.
Note: Don't use
originalMaterial = skeletonAnimation.GetComponent<MeshRenderer>().materialas.materialreturns an instance copy of your primary Material, not the Material itself. It is also not recommended to useoriginalMaterial = skeletonAnimation.GetComponent<MeshRenderer>().sharedMaterial, as it might return null when the primary Material is not assigned yet, e.g. when the active frame has no active attachments or when called too early.
To use a replacement Material on just a specific slot, you can use SkeletonRenderer.CustomSlotMaterials:
skeletonAnimation.CustomSlotMaterials.Remove(slot); // to disable that replacement.
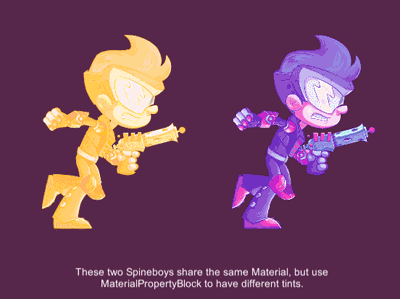
Tinting Skeletons while retaining batching
Using different Materials or MaterialPropertyBlocks on skeleton instances breaks batching. If you only need to tint individual skeleton instances differently and require no other material property modifications, you can use the Skeleton.R .G .B .A color properties. For tinting to be applied, Advanced - PMA Vertex Colors must be enabled at the SkeletonRenderer Inspector.
...
skeleton = GetComponent<SkeletonRenderer>().Skeleton;
...
skeleton.R = color.r;
skeleton.G = color.g;
skeleton.B = color.b;
skeleton.A = color.a;
These skeleton color values will set vertex colors and don't affect your Material properties.
Same applies for tinting individual attachments:
...
slot.R = slotColor.r;
slot.G = slotColor.g;
slot.B = slotColor.b;
slot.A = slotColor.a;
Note: When your animations modify attachment color values, be sure to set any Slot color values after the animations have been applied by using e.g. the SkeletonAnimation.UpdateComplete callback.
MaterialPropertyBlocks
You can use Renderer.SetPropertyBlock to override material property values for a single MeshRenderer.
mpb.SetColor("_FillColor", Color.red); // "_FillColor" is a named property on the used shader.
mpb.SetFloat("_FillPhase", 1.0f); // "_FillPhase" is another named property on the used shader.
GetComponent<MeshRenderer>().SetPropertyBlock(mpb);
// to deactivate the override again:
MaterialPropertyBlock mpb = this.cachedMaterialPropertyBlock; // assuming you had cached the MaterialPropertyBlock
mpb.Clear();
GetComponent<Renderer>().SetPropertyBlock(mpb);
Note: Parameter names used at a
MaterialPropertyBlock, such as_FillColoror_FillPhase, have to match the name of the respective shader variable. Note that the shader variable name is not the name displayed in the Inspector, such asFill ColorandFill Phase. To view the shader parameter names, you can open the.shaderfile (via the Material's gear icon menu, selectEdit Shader) and have a look at the top-most secion calledProperties { .. }. There you will find a listing of all parameters. In a parameter line like the following, it is the leftmost name_FillColor:_FillColor ("Fill Color", Color) = (1,1,1,1)
^^^^^^^^^^Shader variable names typically start with an
_character, and they never contain any spaces. The strings next to it like"Fill Color"is what is displayed in the Inspector.
You can find a demonstration of per-instance material properties in the example scene Spine Examples/Other Examples/Per Instance Material Properties.
Notes on optimization
- Using Renderer.SetPropertyBlock with different Material values will break batching between renderers. Batching will take place between renderers when MaterialPropertyBlock parameters are equal, e.g. all setting tint color to the same green color.
- You need to call
SetPropertyBlockwhenever you change or add a property value to your MaterialPropertyBlock. But you can keep that MaterialPropertyBlock as part of your class so you don't have to keep instantiating a new one whenever you want to change a property.- When you need to set a property frequently, you can use the static method:
Shader.PropertyToID(string)to cache the int ID of that property instead of using the string overload of MaterialPropertyBlock's setters.
Transparency and Draw Order
All spine-unity shaders use alpha blending to cleanly draw semi-transparent transitions at borders of attachments. Without alpha blending (using a hard transparency threshold) hard jagged outlines would be the result, similar to aliasing artifacts.
Unfortunately, alpha blending presents classical problems as the z-buffer cannot be used for automatic depth sorting. Instead, triangles need to be rendered in back-to-front order, painting parts over each other. Each SkeletonRenderer generates it's mesh accordingly, with triangles following the Slot draw order defined in Spine. Within a single mesh, even a single draw call will paint correctly ordered skeleton parts.
Between meshes, spine-unity utilizes many of Unity’s render order systems to determine what mesh should be on top of which. Using the standard spine-unity setup, whole skeleton meshes are rendered in an order determined by multiple factors:
- Camera depth. Relevent in multi-camera setups.
- Material.renderQueue. When set, it overrides the shader's
Queuetag. - Shader's
Queuetag. Defaults to"Transparent"queue inSpineshaders as other sprites. - Sorting Group components. When placed on the MeshRenderer's GameObject or on any of the parents GameObjects.
- Renderer's SortingLayer and SortingOrder within a layer.
- Distance from the camera. Cameras can be configured whether planar or perspective distance is used.
If a scene's renderers are in the same sorting layer and order and the shader Queue tags are equal, you can control sorting of your Spine GameObjects via distance to the camera. Note that cameras provide a transparencySortMode property.
Sorting Layer and Order in Layer
The inspector of a SkeletonRenderer provides Sorting Layer and Order in Layer properties which actually modify the MeshRenderer's sortingLayerID and sortingOrder properties. These properties are stored as part of MeshRenderer and are not part of SkeletonRenderer.
You can access these properties via code:
Preventing Incorrect Sorting
Especially when using an orthographic camera, it may occur that skeletons using multiple atlas pages are sorted incorrectly. You can counter this by adding a Sorting Group component to the skeleton GameObject. Another workaround is to rotate the camera by a tiny amount, e.g. set the camera's transform rotation Y value to 0.001.
Objects Between Skeleton Parts
You may want to display other GameObjects between parts of your character, e.g. to let your character run into a tree and display one leg in front and one behind the trunk.
spine-unity provides a SkeletonRenderSeparator component for the purpose of splitting a skeleton into multiple parts.
Fading a Skeleton In or Out
Unfortunately, alpha blending will cause back parts of your skeleton show through when lowering the alpha value of your skeleton to make it semi-transparent. This is a common problem due to transparency being applied when each triangle is drawn.
One solution to this problem is to use a temporary RenderTexture. You can render the whole character to the RenderTexture at normal opacity and then draw the content of this RenderTexture to your scene at the desired fade opacity. You can use the provided SkeletonRenderTexture and SkeletonRenderTextureFadeout example components for this purpose. You can find a demonstration of these components in the example scene Spine Examples/Other Examples/RenderTexture FadeOut Transparency.
Note that this is only one of many ways to achive a fade-out effect. There may be other easier solutions such as gradually tinting the skeleton with a solid color, decreasing scale, etc. Existing 2D games may serve as valuable inspiration, as RenderTextures are a costly solution that has rarely been used in the past.
Shaders
The spine-unity runtime includes several different shaders. By default, the Spine/Skeleton shader will be assigned at a newly imported skeleton Material. You can change the shader via the Material's Shader parameter as usual. Below you will find a list of included Spine shaders.
Important Note: Use only special
CanvasRenderercompatible shaders withSkeletonGraphiccomponents. See SkeletonGraphic - Important Material Requirements for details.
Important Note: The spine-unity runtime package provides only Built-In Render Pipeline shaders, which are not compatible with Universal Render Pipeline projects. If you're using Universal Render Pipeline, please use the provided URP shaders of the Spine URP Shaders extension UPM package instead.
Note: Deferred Shading rendering path is not yet supported by Spine shaders.
-
Spine/Skeleton (Default Shader)
Unlit transparent shader. Does not write to the z-buffer. -
Spine/Skeleton Graphic (Default shader for SkeletonGraphic)
Unlit transparent shader used by SkeletonGraphic. Does not write to the z-buffer. Does not supportAdditiveblend mode when used with aCanvasGroup, when required useSpine/Skeleton Graphic Tint Blackinstead. Limited to a single texture because of CanvasRenderer limitations. -
Spine/Skeleton Lit
Simple lit transparent shader, no normal map support. Does not write to the z-buffer. -
Spine/Skeleton Lit ZWrite
Simple lit transparent shader, no normal map support. Writes to the z-buffer. -
Spine/Skeleton Fill
Unlit transparent shader with customizable color overlay. Does not write to the z-buffer.
FillColordetermines the overlay color,FillPhasethe color overlay intensity. -
Spine/Skeleton Tint
Unlit transparent shader with customizable two-color tint, tinting dark colors separately from light colors, called tint black. Does not write to the z-buffer.The texture's lighter colors are tinted with
Tint Color, the texture's darker colors withBlack Pointcolor. This allows a tinted texture to be brighter than its original color, compared to ordinary multiply color blending. When setting bothTint ColorandBlack Pointto the same color it will result in a solid color overlay. When settingTint Colorto black andBlack Pointto white, the texture color will be inverted. -
Spine/Skeleton Tint Black
Unlit transparent shader with Spine-animated per-slot tint black feature. Does not write to the z-buffer.
Spine provides a Tint Black feature for slots, allowing animated black tint.Required additional setup step (for tint color vertex data):
- Enable
Tint Blackin the SkeletonAnimation's inspector in theAdvancedsection:
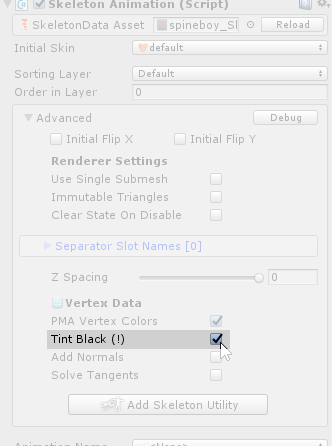
- Enable
-
Spine/Skeleton Tint Black Additive
Unlit transparent shader with Spine-animated per-slot tint black feature. Uses additive blend mode. Does not write to the z-buffer. -
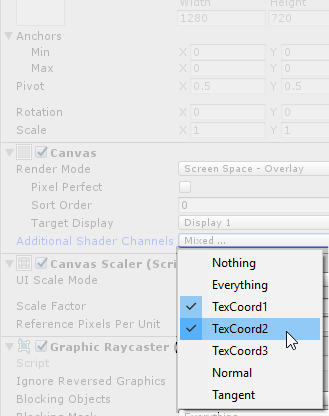
Spine/SkeletonGraphic Tint Black
Variant ofSpine/Skeleton Tint Blackshader for SkeletonGraphic. SupportsAdditiveblend mode when used with aCanvasGroup.Required additional setup steps (for tint color vertex data):
- Enable
Tint Blackin the SkeletonAnimation's inspector in theAdvancedsection. - Set the Material of the SkeletonGraphic to the
SkeletonGraphicTintBlackmaterial located in the respective subfolder ofSpine/Runtime/spine-unity/Materialswhich suits your PMA or Straight alpha texture workflow, with or without CanvasGroup support.

- Select the parent Canvas and under
Additional Shader ChannelsenableTexCoord1andTexCoord2.
Required additional setup steps for
Additiveblend mode at aCanvasGroup:- a) spine-unity 4.2 and newer: Enable
CanvasGroup Compatibleat the SkeletonGraphic inspector in theAdvancedsection.
b) on older versions: EnableCanvas Group Tint Blackat the SkeletonGraphic inspector in theAdvancedsection. - Enable
CanvasGroup Compatibleat the shader.
- Enable
-
Spine/Sprite
Sophisticated configurable shaders, allowing for more advanced lighting than theSpine/Skeleton Litshader. You can find a demonstration of theSpine/Sprite/Vertex Litshader in the example sceneSpine Examples/Other Examples/Sprite Shaders.- Spine/Sprite/Unlit
Unlit shader with configurable blend mode, overlay color, hue, saturation and brightness adjustments. Configurable to write to z-buffer. Fog support. - Spine/Sprite/Vertex Lit
Sophisticated vertex-lit shader with configurable blend mode.
Supports normal maps, secondary albedo, metallic and emission maps.
Configurable color ramp for cel-shaded look and rim lighting based on normals.
Configurable overlay color, hue, saturation and brightness adjustments.
Configurable to write to z-buffer. Fog support. - Spine/Sprite/Pixel Lit
Pixel-lit variant ofSpine/Sprite/Vertex Litshader. The only shader that receives per-pixel realtime shadows. This shader always writes to the z-buffer (ZWriteis enabled as it uses aForwardAddpass).
- Spine/Sprite/Unlit
-
Spine/Special
- Spine/Special/Skeleton Grayscale
Unlit transparent shader for grayscale rendering with customizable intensity. Does not write to the z-buffer. - Spine/Special/Skeleton Ghost
Special shader used by SkeletonGhost component for trail rendering.
- Spine/Special/Skeleton Grayscale
-
Spine/Blend Modes
Intended for slots that have blend modesAdditive,MultiplyandScreenassigned in the Spine editor. It is recommended to automatically assign blend mode materials on import via the SkeletonData Blend Mode Materials.- Spine/Blend Modes/Skeleton PMA Additive
Unlit transparent shader. Uses additive blend mode. Does not write to the z-buffer. - Spine/Blend Modes/Skeleton PMA Multiply
Unlit transparent shader. Uses multiply blend mode. Does not write to the z-buffer. - Spine/Blend Modes/Skeleton PMA Screen
Unlit transparent shader. Uses screen blend mode. Does not write to the z-buffer.
- Spine/Blend Modes/Skeleton PMA Additive
-
Spine/Outline
All shaders above provide anOutlineparameter which can be enabled to switch to the respectiveSpine/Outlineshader variant, drawing an additional colored outline around the skeleton. You can find a demonstration of theSpine/Outlineshaders in the example sceneSpine Examples/Other Examples/Outline Shaders.- Spine/Outline/OutlineOnly-ZWrite A special single-pass shader rendering only the outline. Writes to the z-buffer for proper outline occlusion at overlapping attachments. Can also be used when your skeleton requires multiple materials, where normal outline shaders will incorrectly outline each submesh instead of the whole skeleton. You can use e.g. the
RenderCombinedMeshcomponent to re-render your combined skeleton mesh with this outline-only shader to add the outline behind your skeleton.
- Spine/Outline/OutlineOnly-ZWrite A special single-pass shader rendering only the outline. Writes to the z-buffer for proper outline occlusion at overlapping attachments. Can also be used when your skeleton requires multiple materials, where normal outline shaders will incorrectly outline each submesh instead of the whole skeleton. You can use e.g. the
Post Processing Effects
Some post processing effects like Depth of Field (DoF) require the shader to write to the z-buffer (to be more precice, to a depth pre-pass depth buffer). Some of the Spine shaders provide a Depth Write (also called ZWrite) parameter which can be enabled at the material, others write to the z-buffer by default. See the documentation above about which of the provided Spine shaders write to the z-buffer.
Depending on the project's Graphics settings (or Render Pipeline Asset Settings respectively), it might not be sufficient that the shader writes to the z-buffer, e.g. when using URP-HighFidelity as Render Pipeline Asset. In this case you also need to change the Render Queue of the Material from Transparent to AlphaTest.
If you feel limited by the provided shaders, you can also create your own modified copy of a Spine shader and change any lines reading ZWrite Off to ZWrite On (occurring in each Pass section) and change tags "Queue"="Transparent" to "Queue"="AlphaTest". Don't forget to change the name of the shader in the first line of the file to avoid name clashes.
URP Shaders Extension Package
Universal Render Pipeline (URP) shaders are provided as a separate UPM (Unity Package Manager) package. See section Optional Extension UPM Packages on how to download and install this package and section Updating an Extension UPM Package on how to update it.
The URP Shaders UPM package provides shaders specifically built for Unity's Universal render pipeline, including 2D Renderer functionality.
Note: Do not use URP Shaders with
SkeletonGraphiccomponents. See SkeletonGraphic - Important Material Requirements for details.
Note: Deferred Rendering Path, which has recently been added to the Universal Render Pipeline, is not yet supported by Spine URP shaders.
Shaders for URP with 2D Renderer (do not use with URP (3D) Forward Renderer)
- Universal Render Pipeline/2D/Spine/Skeleton
Universal 2D renderer variant of theSpine/Skeletonshader. - Universal Render Pipeline/2D/Spine/Skeleton Lit
Universal 2D renderer variant of theSpine/Skeleton Litshader. - Universal Render Pipeline/2D/Spine/Sprite
Universal 2D renderer variant of theSpine/Sprite/Vertex LitandPixel Litshaders.
Shaders for URP with 3D Forward Renderer (do not use with URP 2D Renderer)
- Universal Render Pipeline/Spine/Skeleton
Universal variant of theSpine/Skeletonshader. - Universal Render Pipeline/Spine/Skeleton Lit
Universal variant of theSpine/Skeleton Litshader. Can be configured to receive per-pixel realtime shadows. - Universal Render Pipeline/Spine/Sprite
Universal variant of theSpine/Sprite/Vertex LitandPixel Litshaders. Receives per-pixel realtime shadows. - Universal Render Pipeline/Spine/Outline/Skeleton-OutlineOnly
Universal variant of theSpine/Outlineshaders. URP does not allow multiple passes per shader, so it requires a separate material. You might want to consider theRenderExistingMeshcomponent, as demonstrated in thecom.esotericsoftware.spine.URP-shaders/Examples/Outline Shaders URPexample scene included in this package. If your skeleton requires multiple materials, you can use theRenderCombinedMeshcomponent instead of theRenderExistingMeshcomponent.
The shaders can be assigned to materials as usual and will respect your settings of the assigned UniversalRenderPipelineAsset under Project Settings - Graphics.
You can find a demonstration of the URP shaders in the example scenes within the directory com.esotericsoftware.spine.URP-shaders/Examples inside the UPM package:
3D/URP 3D Shaders.unity, 2D/URP 2D Shaders.unity and Outline Shaders URP.unity.
LWRP Shaders Extension Package
Lightweight Render Pipeline (LWRP) shaders are provided as a separate UPM (Unity Package Manager) package. See section Optional Extension UPM Packages on how to download and install this package and section Updating an Extension UPM Package on how to update it.
The LWRP Shaders UPM package provides shaders specifically built for Unity's lightweight render pipeline.
Note: Do not use LWRP Shaders with
SkeletonGraphiccomponents. See SkeletonGraphic - Important Material Requirements for details.
- Lightweight Render Pipeline/Spine/Skeleton
Lightweight variant of theSpine/Skeletonshader. - Lightweight Render Pipeline/Spine/Skeleton Lit
Lightweight variant of theSpine/Skeleton Litshader. - Lightweight Render Pipeline/Spine/Sprite
Lightweight variant of theSpine/Sprite/Vertex LitandPixel Litshaders.
The shaders can be assigned to materials as usual and will respect your settings of the assigned LightweightRenderPipelineAsset under Project Settings - Graphics.
You can find a demonstration of the LWRP shaders in the example scene com.esotericsoftware.spine.lwrp-shaders-4.2/Examples/LWRP Shaders.unity in the extracted package.
Shader Graph
Currently there are no official Shader Graph Spine shaders or shader nodes available. Note that when exporting your textures from Spine using Straight alpha settings, you should be able to use any non-Spine shader available. In case you want to replicate a feature that only the Spine shaders have to offer, please have a look at the forum for postings like these [1], [2]. If you have any questions, you can always start a new forum thread in the Unity subforum.
Amplify Shader Editor
While there is no officially provided shader template for the Amplify Shader Editor, user Hana has kindly shared template code on the forum here.
Writing your own shaders
Please first familiarize with how to write custom shaders for Unity in general. Especially Tutorial: vertex and fragment programs provides a good overview, allowing you to more easily understand what the individual parts of spine-unity shaders are doing.
Starting from an existing spine-unity shader
It is highly recommended to start with a copy of an existing spine-unity shader. You can then gradually modify an already working shader to adjust it to achieve the desired effect. You can for example add additional color processing before returning the final color. The following code shows a short example on how to create a modified version of the SkeletonGraphic shader extended by grayscale functionality:
{
_GrayIntensity("Intensity", Range(0, 1)) = 1 // this line was added to provide a Material property
[..]
}
float _GrayIntensity; // this parameter was added
..
fixed4 frag (VertexOutput IN) : SV_Target
{
..
color.rgb = lerp(color.rgb, dot(color.rgb, float3(0.3, 0.59, 0.11)), _GrayIntensity); // this line was added
return color;
}
Caveats when using non-Spine shaders or visual shader editors
Be sure to consider the following differences between typical spine-unity shaders and other non-Spine shaders:
- Backface culling must be disabled by setting
Cull Offwhen rendering any Spine skeletons. - Spine shaders typically don't need normals, therefore
Advanced - Add Normalsmay need to be enabled at your component when using lit shaders. - Spine shaders typically don't need tangents, therefore
Advanced - Solve Tangentsmay need to be enabled at your component when using normal maps. - Spine shaders were using Premultiply Alpha textures by default until (including) spine-unity 4.2. Either
a) export atlas textures as Straight alpha, or
b) change the blend mode of the shader to PMA blend modeBlend One OneMinusSrcAlpha. - Spine vertex colors are typically PMA vertex colors. When using transparent or
AdditiveSlots, you may either
a) change the blend mode of the shader to PMA blend modeBlend One OneMinusSrcAlphaand use PMA atlas textures, or b) disableAdvanced - PMA Vertex Colorsat your component (not renderingAdditiveSlots then).
As always, general rules for UI and non-UI shaders apply:
- Do not use UI shaders on
SkeletonAnimationorSkeletonMecanim. - Do not use non-UI shaders on
SkeletonGraphic.
Analysis of the Spine/Skeleton shader
The following section provides an analysis of the Spine/Skeleton shader. This shader is applied by default when a Material is generated upon importing your Spine texture atlas. The Spine/Skeleton shader is fairly short and typical, and has the following characteristics:
- Premultiply Alpha (PMA) blending
- No depth buffer writing
- No lighting
- No backface culling
- No fog
- Uses vertex colors to tint the texture via multiply
- Optionally uses straight alpha instead of PMA textures
- Has a
"ShadowCaster"pass so it can cast realtime shadows - Material Properties:
- _MainTex "Main Texture"
- _StraightAlphaInput "Straight Alpha Texture"
- _Cutoff "Shadow alpha cutoff"
- Advanced parameters:
- _StencilRef "Stencil Reference"
- _StencilComp "Stencil Comparison"
- Outline parameters (_OutlineWidth "Outline Width", etc.)
In detail:
-
Premultiply Alpha (PMA) blending
hlslBlend One OneMinusSrcAlphaBlending is defined as
result_rgba = frag_output_rgba * src_factor + framebuffer_rgba * dst_factor.
The non-standardBlend One OneMinusSrcAlphaPMA blend mode allows Slots that are set toAdditiveblend mode to be drawn in a single render pass withNormalblend mode Slots. This is achieved by usingOneatSrcFactorin the above line (instead ofSrcAlpha). This adds the unmodifiedfrag_output_rgbavalue to theOneMinusSrcAlphaweightedframebuffer_rgba:
a) ForNormalblending the fragment shader multipliesRGBbyAand leavesAas-is.
b) ForAdditiveblendingRGBis not multiplied by alpha, andAis set to0, receivingresult_rgba = frag_output_rgba + (1-0) * framebuffer_rgba.The
NormalandAdditiveSlot blend modes are implicitly passed to the shader as vertex color when the Advanced -PMA Vertex Colorsis enabled at yourSkeletonRendererorSkeletonGraphicComponent:hlslstruct VertexInput {
float4 vertexColor : COLOR
}When multiplying the PMA vertex colors with the sampled PMA texture colors, Slot blend modes
NormalorAdditiveare automatically applied:hlslreturn (texColor * i.vertexColor);So to support proper
NormalandAdditivePMA blend modes in your shader:- Define the blend function as
Blend One OneMinusSrcAlpha - Multiply the texture color by the vertex color
- Enable Advanced -
PMA Vertex Colorsat the Component.
If you want to use a shader using standard blend mode
Blend SrcAlpha OneMinusSrcAlphaand don't needAdditiveSlots, you need to make sure to export your used atlas textures from Spine as Straight alpha. - Define the blend function as
-
No depth buffer writing
hlslZWrite OffNot writing to the depth buffer is typical of an alpha-blended 2D sprite shader. Transparent objects will be drawn in back-to-front order according to your
Camera.transparencySortModeinstead of relying on the depth buffer for depth sorting.Spine/Skeletonshares this characteristic with Unity's ownSprites/Defaultshader.If you want to use a shader that has depth write enabled, be sure to set
Advanced - Z-Spacingto a value other than0at yourSkeletonRendererorSkeletonGraphicComponent to prevent Z-Fighting, especially if you have lighting applied. Note that using the depth buffer may cause unwanted results around semitransparent areas, including aliasing effects on edges. -
No lighting
TheSpine/Skeletonshader is not affected by any Lights that are placed in the scene and will always be rendered in fulltexColor * i.vertexColorintensity.In order to apply lighting in a shader it is recommended to start from a working lit shader and modify your own copy accordingly. Simply changing the line
Lighting OfftoLighting Onwill not lead to the desired effect, you need to evaluate lights in your vertex shader (for per-vertex lighting) or fragment shader functions (for per-pixel lighting) to multiply the color intensity accordingly. Also note that URP, URP-2D and standard-pipeline shaders all use a different lighting evaluation setup, so be sure to choose your reference shader accordingly. -
No backface culling
hlslCull OffThe only strict requirement for rendering Spine skeletons is to disabling backface culling, which is typical for 2D shaders.
Most 3D shaders will have backface culling enabled. With Spine meshes, this will cause some triangles to become invisible when parts are scaled negatively or if you flip your skeleton direction.
-
No fog
TheSpine/Skeletonshader is not affected by fog.Enabling fog at your shader will require some additional vertex parameters and function calls added to your shader code. From
UnityCG.cginc:hlslmulti_compile_fog Will compile fog variants.
UNITY_FOG_COORDS(texcoordindex) Declares the fog data interpolator.
UNITY_TRANSFER_FOG(outputStruct,clipspacePos) Outputs fog data from the vertex shader.
UNITY_APPLY_FOG(fogData,col) Applies fog to color "col". Automatically applies black fog when in forward-additive pass.
Can also use UNITY_APPLY_FOG_COLOR to supply your own fog color.You can have a look at the
Spine/Sprite/Unlitshader on how to apply fog in your shader:hlsl#pragma multi_compile_foghlslUNITY_FOG_COORDS(1) // to declare it at the free attribute TEXCOORD1hlslUNITY_TRANSFER_FOG(output,output.pos); -
Uses vertex colors to tint the texture via multiply
See Premultiply Alpha (PMA) blending above. -
Optionally uses straight-alpha instead of PMA textures
Since theSpine/Skeletonshader's blend mode is constantly set to PMA blending, an input texture without premultiplied alpha colors needs to be converted to a PMA color after sampling. The following lines implement this feature:// bool Material parameter, enables the _STRAIGHT_ALPHA_INPUT shader keyword when enabled
[Toggle(_STRAIGHT_ALPHA_INPUT)] _StraightAlphaInput("Straight Alpha Texture", Int) = 0
..
// compiles the shader in two variants so that shader keywords can switch between both variants
#pragma shader_feature _ _STRAIGHT_ALPHA_INPUT
..
// when enabled, multiply texture rgb values by the texture alpha value.
#if defined(_STRAIGHT_ALPHA_INPUT)
texColor.rgb *= texColor.a;
#endif -
Has a
"ShadowCaster"pass so it can cast realtime shadows
The second pass withTags { "LightMode"="ShadowCaster" }is automatically identified as shadow caster pass by theLightMode. AShadowCasterpass does not write any RGB colors but instead writes depth information to a shadow buffer. Therefore it must useZWrite On. Since you cannot write semi-transparent depth, the fragment can either be written to the depth buffer, or discarded to not cast a shadow. This is done with the thresholding function call:hlslclip(texcol.a * i.uvAndAlpha.a - _Cutoff);Here the
_CutoffMaterial parameter defines the alpha threshold, a fragment is discarded byclip(x)if x < 0. -
Material Properties:
- _MainTex "Main Texture"
The main texture. - _StraightAlphaInput "Straight Alpha Texture"
See "Optionally uses straight-alpha instead of PMA textures" above. - _Cutoff "Shadow alpha cutoff"
See "Has a"ShadowCaster"pass so it can cast realtime shadows" above. - Advanced parameters:
- _StencilRef "Stencil Reference"
Used for mask interaction. - _StencilComp "Stencil Comparison"
Used for mask interaction, will be set bySkeletonRendererorSkeletonGraphicComponent according toMask Interactionproperty. - Outline parameters (_OutlineWidth "Outline Width", etc.)
Used when switching to outline shader variantSpine/Outline/Skeleton. Not used in the normal non-outline shader variantSpine/Skeleton.
- _StencilRef "Stencil Reference"
- _MainTex "Main Texture"