Licensing
A Spine license is required to integrate the Spine Runtimes into your applications.
Installation
As a prerequisite, you must have a working Unity project to which you can add the spine-unity runtime.
- Download and install Unity.
- Create a new empty project in the Unity Editor.
There are multiple installation options to add the spine-unity runtime to your Unity project:
Via Unitypackage
You can install the spine-unity runtime into your Assets folder via the spine-unity unitypackage.
- Download the latest spine-unity unitypackage.
- Import the unitypackage (double-click it or drop it onto the Project panel in Unity to import it).
The latest spine-unity unitypackages are available on the Spine Unity Download page.
Via Git
Alternatively to installing from the unitypackage, you can get the latest changes via Git as described below.
- Clone the spine-runtimes Git repository.
- Copy the contents of
spine-runtimes/spine-unity/Assets/to your project'sAssets/folder. - Copy the folder
spine-runtimes/spine-csharp/srcto your project'sAssets/Spine/Runtime/spine-csharpfolder.
Via Unity Package Manager
Alternatively, you can install and update the spine-unity runtime via the Unity Package Manager.
If your Unity version is rather recent and your Unity Package Manager provides the Add package from git URL... option, you can directly add the three packages with these URLs:
https://github.com/EsotericSoftware/spine-runtimes.git?path=spine-csharp/src#4.2https://github.com/EsotericSoftware/spine-runtimes.git?path=spine-unity/Assets/Spine#4.2https://github.com/EsotericSoftware/spine-runtimes.git?path=spine-unity/Assets/Spine Examples#4.2
The latest Unity Package Manager URLs are also available on the Spine Unity Download page.
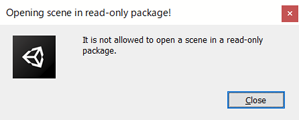
To open the example scenes of the
Spine Examplespackage, please copy the scene files from the package directory to yourAssetsdirectory using your system's file manager (Explorer or Finder respectively). Unfortunately a bug in Unity causes the error"Opening scene in read-only package!"when trying to directly open a scene within a package downloaded via git URL:
Details
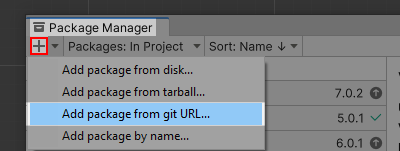
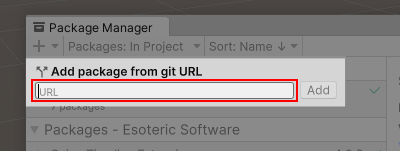
Open the Package Manager in Unity (via Window > Package Manager). For each of the three packages, select the + icon, choose Add package from git URL..., and enter the git URL above (or from the download page). The part #4.2 determines the branch and can also be set to a specific git commit hash like #5e8e4c21f11603ba1b72c220369d367582783744 to ensure everyone on your project has the same consistent state of the package. 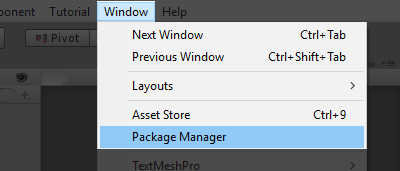
 The
The Package Manager window will now list the added package entry. 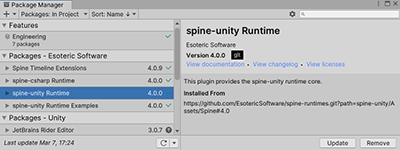 In the
 Project panel you will now find spine-unity Runtime and spine-unity Runtime Examples entries under Packages. 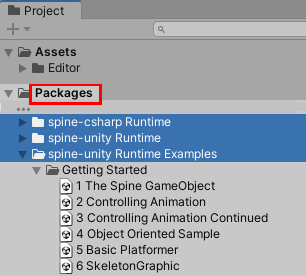 If the entry is not yet listed in the
 Project panel, you may need to close and re-open Unity.
Optional Extension UPM Packages
The spine-unity runtime works without additional plugins. Some optional features, such as Timeline or Universal Render Pipeline (URP) support, are provided via separate Unity Package Manager (UPM) extension packages.
Why separate extension packages
Unity has moved many of their optional modules to the new Unity Package Manager (UPM) ecosystem. For example, their Universal Render Pipeline base shader files are also provided as a UPM package under the name Universal RP and not part of every new Unity project out of the box.
Including our Universal RP Spine shaders in the spine-unity runtime would lead to confusing error messages and additional configuration steps in case Unity's Universal RP package has not been installed in a project. By providing our Universal RP Spine shaders as a UPM package, such dependencies are automatically resolved, making it easier to use this additional functionality.
Installation
There are two options on installing extension UPM packages:
- Option A - Downloading the UPM package and installing it locally.
- Option B - Using
Add package from git URL.
A - Download the UPM package
- Download the desired UPM package via the download page or find it in the spine-unity/Modules subdirectory in the Git repository.
- Having your Unity project open, it is recommended to close any scene containing Spine components (e.g. by opening a new empty scene).
- After unzipping or cloning, you can make use of the package in one of these two ways:
- a) Copy into your project
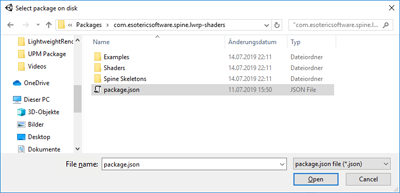
Copy the package contents to thePackagesdirectory in your project. Unity will load it automatically. - b) Via the Package Manager
Copy the package contents anywhere outside yourAssetsdirectory, then open thePackage Managerin Unity (viaWindow > Package Manager), select the+icon, chooseAdd package from disk..., and point it to thepackage.jsonfile. 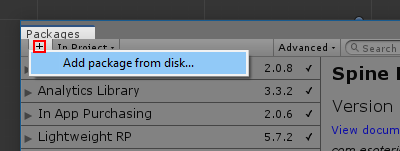
 The
The Package Managerwindow will now list aSpine Lightweight RP Shadersentry: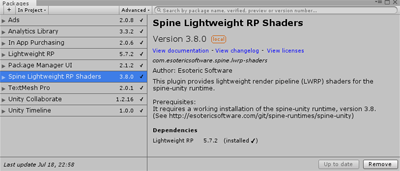 In the
 Projectpanel you will now also find aSpine Lightweight RP Shadersentry underPackages: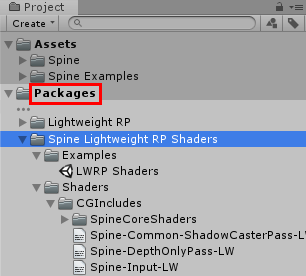 If the entry is not yet listed in the
 Projectpanel, you may need to close and re-open Unity.
- a) Copy into your project
- To add example scenes available at a UPM package like the Spine URP Shaders UPM package, first select the package, then select
SamplesandImport.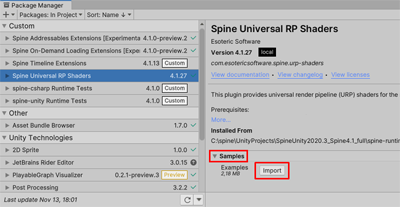
B - Add package from git URL
If your Unity version is rather recent and your Unity Package Manager provides the Add package from git URL... option, you can also directly use the git URL.
Important Note: When installing the
URP Shaders UPM packagefrom git URL, it is required that you also have thespine-csharpandspine-unitypackages installed via the Unity Package Manager, and not from a unitypackage to theAssetsfolder. OtherwiseURP Shaders UPM packageshader include paths point to a spine-unity package directory which does not exist, leading to shader compile errors.
- Find the git URL for your UPM package on the download page.
- Having your Unity project open, it is recommended to close any scene containing Spine components (e.g. by opening a new empty scene).
- Open the
Package Managerin Unity (viaWindow > Package Manager), select the+icon, chooseAdd package from git URL..., and enter the git URL from the download page. E.g.https://github.com/EsotericSoftware/spine-runtimes.git?path=spine-unity/Modules/com.esotericsoftware.spine.urp-shaders#4.2The part#4.2determines the branch and can also be set to a specific git commit hash like#5e8e4c21f11603ba1b72c220369d367582783744to ensure everyone on your project has the same consistent state of the package. 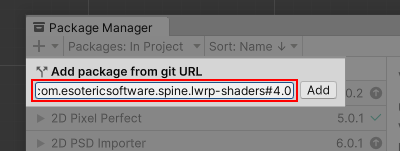 The
The Package Managerwindow will now list aSpine Lightweight RP Shadersentry: In the Projectpanel you will now also find aSpine Lightweight RP Shadersentry underPackages: If the entry is not yet listed in the Projectpanel, you may need to close and re-open Unity. - To add example scenes available at a UPM package like the Spine URP Shaders UPM package, first select the package, then select
SamplesandImport.
Note for older UPM packages:
Older versions of UPM packages directly contained example scenes in the normal package structure. To open the example scenes contained in the package, please copy the scene files from the package directory to yourAssetsdirectory using your system's file manager (Explorer or Finder respectively). Unfortunately a bug in Unity causes the error"Opening scene in read-only package!"when trying to directly open a scene within a package downloaded via git URL:
Samples
To explore the spine-unity runtime example scenes:
- Download and install Unity.
- Create a new empty project in the Unity Editor.
- Download the latest spine-unity unitypackage and import it. Alternatively you can install spine-unity via Git or the Unity Package Manager as described in the Installation section above.
- Open the project in the Unity Editor, then checkout the different example scenes in the
Spine Examples/Getting Startedfolder in the Project panel. Each example scene has text instructions on how to run it and a description of what you see.
You can inspect and modify the C# code of both the samples and the spine-unity runtime by opening the project in Unity Editor and selecting Assets -> Open C# Project. For additional information on the example scenes, please see section Example Scenes.
Updating the spine-unity Runtime
Upgrade Guide
Before updating your project' spine-unity runtime, please consult our guide on Spine editor and runtime version management.
Note: Json and binary skeleton data files exported from Spine 4.1 or earlier will not be readable by the spine-unity 4.2 runtime! The skeleton data files need to be re-exported using Spine 4.2.
If you have many projects, we suggest automating exporting your project files as described here.
For example, we use this script to export all the Spine example projects and to create texture atlases: export.sh
Please consult the following upgrade guides when updating from spine-unity 3.6, 3.7, 3.8, 4.0 or 4.1 to newer versions:
- spine-unity 3.6 to 3.7 Upgrade-Guide
- spine-unity 3.7 to 3.8 Upgrade-Guide
- spine-unity 3.8 to 4.0 Upgrade-Guide
- spine-unity 4.0 to 4.1 Upgrade-Guide
- spine-unity 4.1 to 4.2 Upgrade-Guide
- spine-unity 4.2 to 4.3 Upgrade-Guide
It is recommended to perform the following steps to prevent potential problems:
- As with Unity updates, it is always recommended that you back up your whole Unity project before performing an update.
- Always check with your Lead Programmer and Technical Artist before updating your Spine runtime. Spine runtimes are source-available and designed to be user-modifiable based on varying project needs. Your project's Spine runtime may have been modified by your programmer. In this case, updating to the latest runtime also requires reapplying those modifications to the new version of the runtime.
- Read the
CHANGELOG.mdfile included in the downloaded unitypackage or on github. You can find the necessary documentation here when obsolete methods have been replaced with new counterparts.
Once you are sure you want to update to the latest spine-unity runtime, you can update spine-unity according to how you installed the package.
Update via Unitypackage
- Get the latest spine-unity runtime by downloading the latest spine-unity unitypackage. Alternatively you can update by pulling the latest changes from the spine-runtimes Git repository via Git as described below.
- Close the Unity Editor and Visual Studio/Xcode.
- When upgrading to a different major or minor version (e.g. from 3.7 to 3.8), delete the previous spine-unity installation directories
Assets/SpineandAssets/Spine Examplesfrom your project. - Open the project in the Unity Editor. In case you removed the previous spine-unity installation, ignore any logged errors.
- Import the unitypackage (you can double-click on it and Unity will open it).
- When upgrading to a different major or minor version, re-import the skeleton assets by selecting
right-click - Reimport Allin the Project panel. Alternatively to not re-import all assets, you can locate the folder containing your Spine skeleton assets in the Project panel that you want to re-import, right-click on the folder, then selectReimport.
Update via Git
- Get the latest spine-unity runtime by pulling the latest changes from the spine-runtimes Git repository.
- When upgrading to a different major or minor version (e.g. from 3.7 to 3.8), delete the previous spine-unity installation directories
Assets/SpineandAssets/Spine Examplesfrom your project. - Copy the contents of
spine-runtimes/spine-unity/Assets/to your project'sAssets/folder. - Copy the folder
spine-runtimes/spine-csharp/srcto your project'sAssets/Spine/Runtime/spine-csharpfolder.
Note: The spine-unity runtime is based on the generic spine-csharp runtime. Make sure to watch changes to both the spine-unity and spine-csharp runtime on GitHub.
Update via Unity Package Manager
If you have added the spine-unity runtime as packages from a remote git URL via Add package from git URL you can use the Unity Package Manager to update the packages.
Open the Package Manager in Unity (via Window > Package Manager), select each of the packages
spine-csharp Runtimespine-unity Runtimespine-unity Runtime Examples
and hit the Update button to re-download the latest version of the specified branch from git.
Note that if your URL has the ending #4.2 as in https://github.com/EsotericSoftware/spine-runtimes.git?path=spine-csharp/src#4.2, it will re-download the latest version from the 4.2 branch of the git repository.
Updating an Extension UPM Package
When upgrading an optional extension UPM package:
- The same principles as updating the Spine Unity runtime apply.
- As mentioned above, it is always recommended that you back up your whole Unity project before performing an update.
Following the installation options, there are two options on updating the package:
A - In-place Update
- If you have your Unity project open, it is recommended to either a) close Unity or b) close any scene containing Spine components (e.g. by opening a new empty scene).
- Copy the content of the new UPM package zip file or git directory over the existing one. Depending on how you have installed the UPM package, this will be either the
project_root/Packages/package_namedirectory in your project or the arbitrary directory outside theAssetsdirectory from where you have loaded it viaAdd package from disk... - If you have closed Unity, open your project again in Unity.
- Unity will import the new assets and display a loading progress bar.
B - Add package from git URL
If you have added the package from a remote git URL via Add package from git URL you can use the Unity Package Manager to update the package. Open the Package Manager in Unity (via Window > Package Manager), select the package that you want to update and hit the Update button to re-download the latest version from the specified branch from git. Note that if your URL has the ending #4.2 as in https://github.com/.../Modules/com.esotericsoftware.spine.timeline#4.2, it will re-download the latest version from the 4.2 branch of the git repository.